This guide may help you install MDriven Server on Windows(8, 10), Windows 2012R2, and Windows 2016.
If you use Windows 7 Enterprise and have a problem with the installation of MDriven Server, please see this article: Installation of MDriven Server on Windows 7 Enterprise.
Installing IIS Services and Its Components
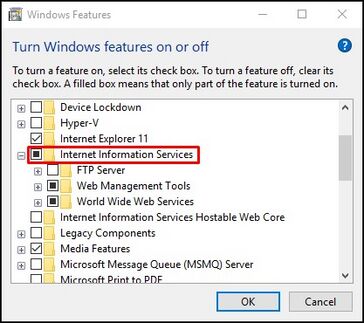
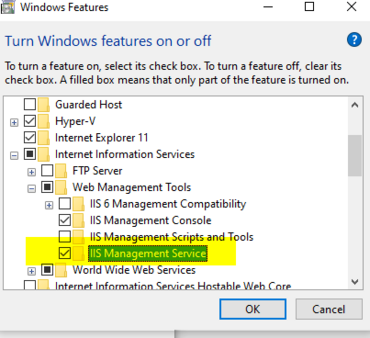
First of all, you need to install IIS on your computer. On Windows(8, 10), head to the Control Panel -> Programs and Features -> Turn Windows features on or off and add Internet Information Services.
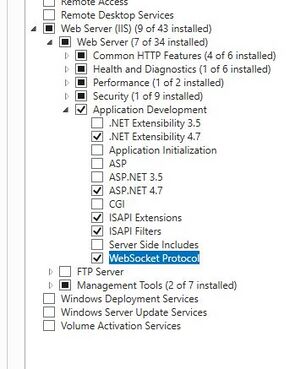
On Windows 2012R2 or Windows 2016, after installation add roles: Web server IIS.
Also, you need to add ASP .NET 4.5(or higher) and its component.
The following features are required to install. ISAPI is dependent on ASP.NET 4.7 and may be skipped.
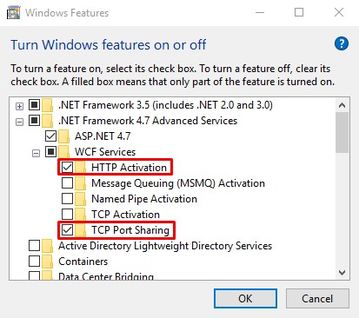
If you are using WCF, the following IIS features should be switched on (WebApi does not use them).
Important! Under .NET Framework 4.7(or higher) "Features", head to WCF Services and select HTTP Activation and TCP Port Sharing.
Important! For Windows 10: Under World Wide Web Services, Common HTTP Features, select Static Content if it's not selected.
You should also consider adding:
- Logging Tools
- Request Monitor
- Tracing
- Dynamic Content Compression
- Application Initialization
- Management Service
- IIS Management Scripts and Tools - also see this described in the next section
- Basic Authentication, Windows authentication, or another authentication service
Note! If you don’t install HTTP Activation, you will get “Error 405 – method not allowed” instead of the MDriven login screen.
Now, you can start IIS Manager on your computer.
If you had some trouble with installation on Windows 2012R2, see also: https://docs.microsoft.com/en-us/iis/install/installing-iis-85/installing-iis-85-on-windows-server-2012-r2
Setting Up IIS Manager
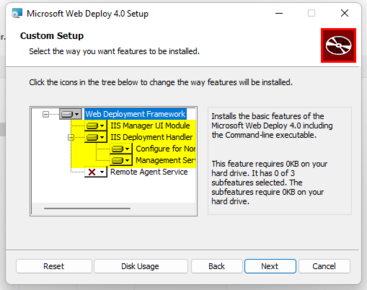
After the installation, install Web Deploy from the Microsoft website - https://www.iis.net/downloads/microsoft/web-deploy)
- Make sure you get IIS Deployment Handler installed (Custom installation, or Add programs + Change installation)
- If you do not see the "IIS Deployment Handler" option, it is because the following IIS feature is not turned on:
Make sure you turn that on and run a Repair on WebDeploy -> Now, you have the "IIS Deployment Handler".
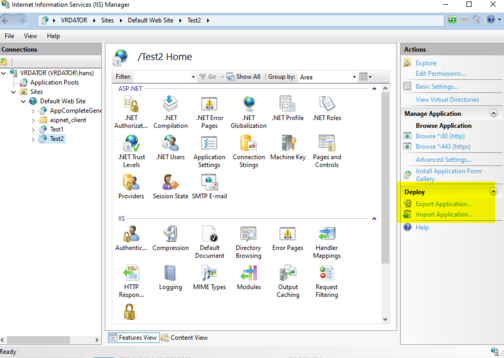
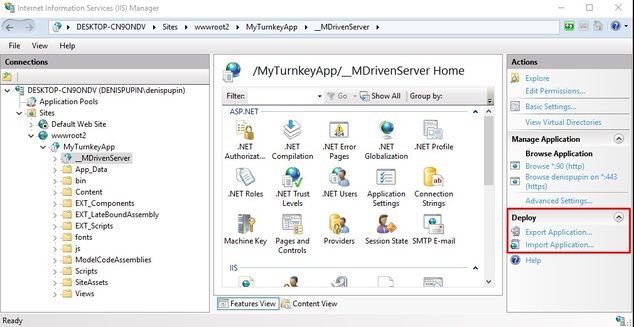
The WebDeploy gives IIS the Import Application option that greatly simplifies installation and updates:
Install MDriven Server
Add an Application Pool
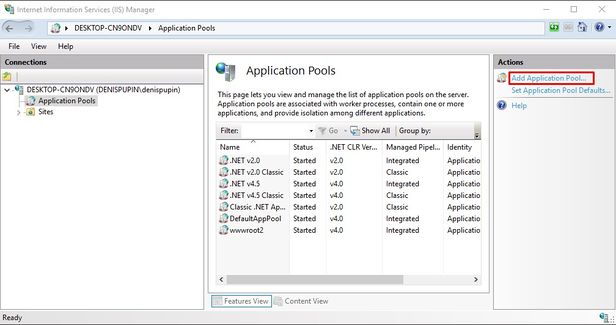
Start IIS Manager and add an Application Pool.
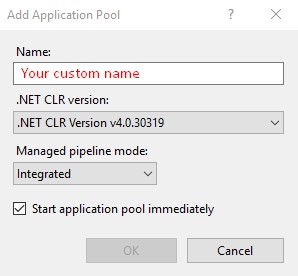
Name your Pool and set it to .NET CLR 4.0 and Integrated pipeline mode.
This step differs when using the Core servers, you use No-Managed-Code: MDrivenServerCore in IIS
Configure the AppPool
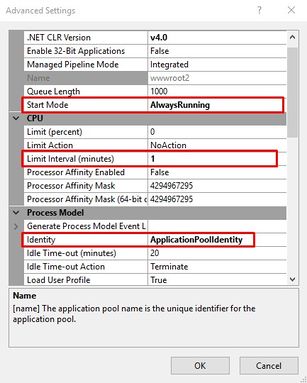
Select your Application Pool, head to Advanced Settings, and set:
- Start mode: AlwaysRunning
- Identity: <choose what suits your needs>
- Limit interval: 1
- Disable Overlapped Recycle: 1
Additional memory settings when hosting more than one site
Check File Permissions
Check this page for information on the AppPool user settings.
The application will act as the AppPool user when accessing the disc. The application will use "%temp%" for extracting AssetsTK and CodeDress assemblies from the modlr file. The AppPool user will also need access to the whole application in order to distribute CodeDress assemblies. In addition, the Logg subdirectory must allow Write and Modify (full control).
Add a Certificate For SSL
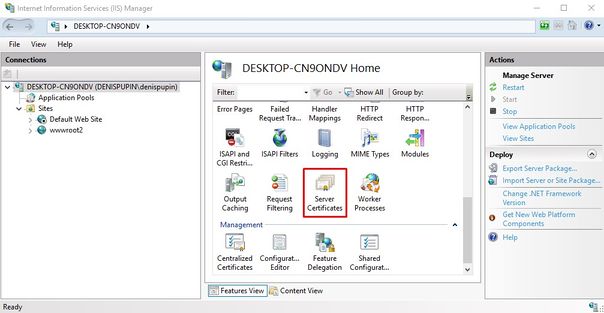
In ISS Manager, select Server Certificates and create a Self-Signed Certificate.
Note! Create the self-signed certificate with your server's machine name.
Notice the name in the certificates "Issued to" field. You'll be using this name when you access your server.
If you don't use this URL, you'll get a certificate error, and the server won't be able to communicate internally, so you can't ignore this error!
Fault-finding certificate problems in IIS
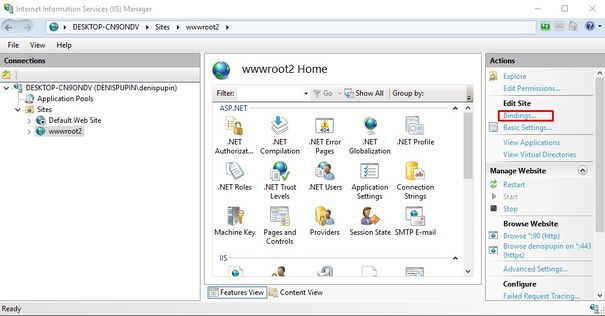
On the Default website or on the website you created, add https binding for port 443 and select the certificate needed.
Installing of MDriven Server
- Add an application and give a descriptive name. Select the Application Pool you created earlier.
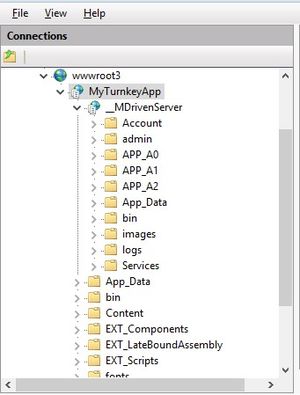
- Create an application with your name ("MyTurnkeyApp) OR (if you want the app on-site root level, choose the site in IIS and deploy the TurnkeyServer. Add __MDrivenServer in the same manner as below)
- Create another application under “MyTrunkeyApp” called “__MDrivenServer” (double underscore) so that it ends up like this: “MyTurnkeyApp/__MDrivenServer”
- Use the deploy function to import the application MDriven Server & MDriven Turnkey which you download from the mdriven.net site (the downloaded zip file will work directly with deploy). The installer will not overwrite your existing database if this is an upgrade. The normal choice when upgrading the framework is to overwrite and not remove the existing files.
Note: During the installation of the MDriven Server or MDriven Turnkey app, if you created the structure before, keep the "application path" field empty to save the needed folders' structure.
As a result, you will get the following application structure:
Setting Up MDriven Server
You can now open your MDrivenServer in a browser via a link.
https://localhost/<Your_application_name>/__MDrivenServer/
Important! You have to change "localhost" in the link to the URL in your certificate (which is usually your full machine name including the domain).
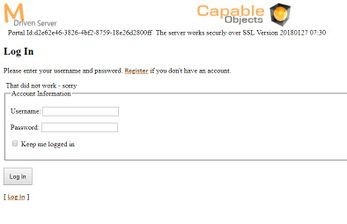
On the first screen, you should register a new user for MDriven Server. For example "admin" (not "a", used by Turnkey)
After this, you may log in and head to Admin area -> Infos, errors and MDrivenServer evolve and push "Evolve Admin database".
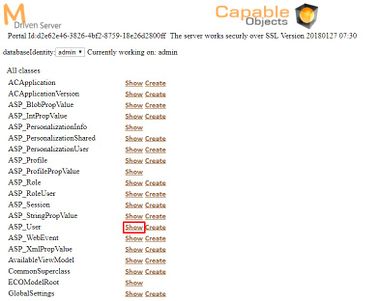
Important! MDriven Turnkey will use a user account named “a”, so you need to go back and head to AutoForm, select "databaseIdentity" to admin.
Choose ASP_User -> Show and there you can see all users of the MDriven Server. The user "a" will be on the top. If you click on "Details", you will be able to change the user name to another one.
After this, you can log out and register user "a" with your own password.
Problem-solving
If you get a 403 error when trying to start the MDriven Server, please make sure that ASP.Net 4.7 (or higher) is installed.
Automation
See: Automating deployment of Turnkey and MDrivenServer on IIS
Video Tutorial
(Please note that this video was created when the MDriven Server was called "Boring Predictable Server" as a working name.)
To make your experience smooth, we set the main tags mentioned in the video to the right bar menu of this mini-player. Choose an interesting subtitle on the list and immediately get to the exact theme navigation item place in the video. Now you can pick any topic to be instructed on without watching the whole video.

