After looking through a lot of ready-made pivot tables, we decided to use the built-in table of HTML/Bootstrap. Why? Because a lot of the features added by third-party pivot/grid add-ins can easily be handled on the server within the model - things like searching, sorting, filtering, and paginating. If we do it within the model and ViewModels, we can move the functionality to other platforms with a minimum of extra work. In addition, operations like search and filter often aren't as straightforward as initially thought, requiring something, not in the grid/pivot, and then the third-party grid component comes short. Still, there’s nothing preventing the use of third-party add-ins for a grid - just let the framework provide the data.
What we do need for a grid/pivot (only pivot from now) is a way to render Cells with different content in all positions. We want the actions to work on cells, not entire rows.
Look at this page for a slightly more complex sample for a background on the thinking of creating a pivot from your model.
Pattern
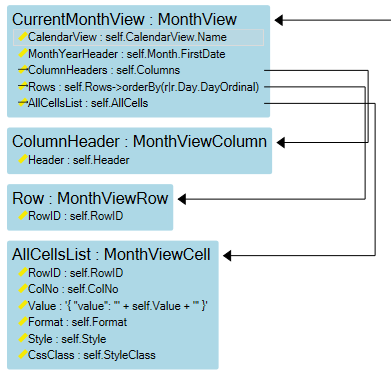
Following that pattern with a different naming conversion to better fit how HTML, BS, and Angular names things, we end up with;
From the example:
CurrentMonthView is a single object, a root of sorts.
The ViewModel “Row” is the one you put on the page where you want your pivot.
As for the other ViewModels, position them outside the screen, for example, at a negative Row value. They will not be rendered, but provide data.
If you compare this with the other Pivot component, there’s an important difference! You need to provide the rows IN ORDER and provide ALL CELLS on every row. Why? Because Angular data binding iterating your arrays can’t “go back” to paint, i.e. it’s not a paint in any order type of display - we have to keep within the confines of HTML and BS.
Because of this, there is no Y-position in “Row” and there’s no X-position in the “ColumnHeader”. There is, however, a RowID in both “Row” and “AllCellsList”, so the client can find the right group of cells for the row, and then lay them out in “ColOrder”. In effect, we’re assuming that the order of column headers and row cells appears in the correct order.
Creating the Described Structure
Simply use a ViewModel and OCL expressions to add objects to the list - probably objects of different types. As long as your ViewModelClass’s attributes evaluate to match the pattern, it will work.
Another way to add more structure is to have modeled classes, either transient or persistent, that organize your data into a structure that matches the pattern.
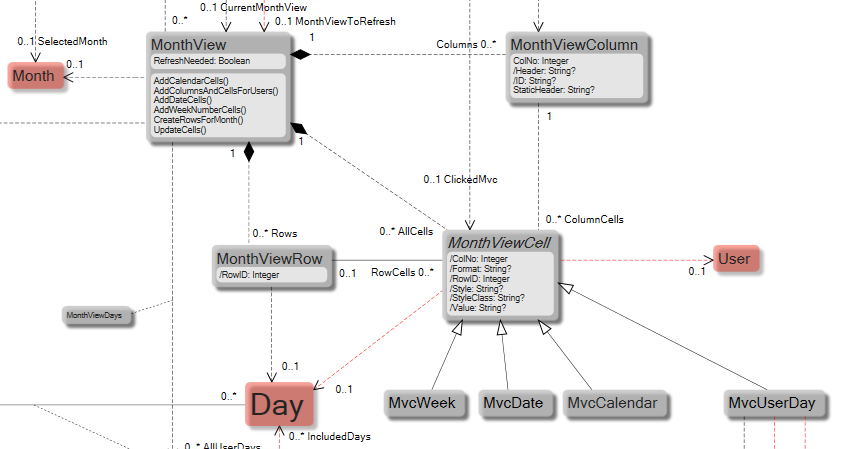
Here’s an example of a transient class (the gray ones) with persistent classes “supporting” them. This is the same example as above.
As you can see, the MonthViewCell class has been subclassed. Why? To make the logic for different cell types easier to maintain and make it easier to place actions for each cell type.
On the subclasses, add OCL to the derived attributes, each working with its own type of information.
Tagged values
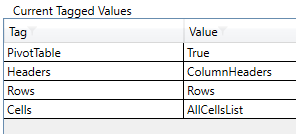
Then add a tagged value like this:
CurrentMonthView
ColumnHeader
Row
No tagged values.
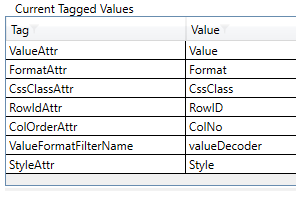
AllCellsList
Most of these are, as you can see when you compare with the example, the names you picked for the different fields in your ViewModel. They all default to the same name (without Attr) if you don’t set them.
Pay extra attention to “RowIdAttr”. You have to provide this attribute in both the Row ViewModelClass and the AllDellsList ViewModelClass. This attribute’s value is what binds the cells to the row. It has to be unique in the list on the screen, not globally.
Not all are required - FormatAttr, CssClassAttr, StyleAttr, and ValueFormatFilterName are optional.


