No edit summary |
m ((username removed) (log details removed)) |
||
| (46 intermediate revisions by 6 users not shown) | |||
| Line 1: | Line 1: | ||
__NOTOC__ | |||
This tutorial will help you set up '''MDriven Turnkey on Microsoft Azure'''. | |||
All the components needed to run MDriven Turnkey (the latest versions of MDriven Server & MDriven Turnkey) are available [https://mdriven.net/server here for MDrivenServer] and [https://mdriven.net/turnkey here for MDrivenTurnkey] - you will need both. | |||
You can run MDriven Turnkey on your Azure account or set it up on your local IIS. To set up on a local IIS, see [[Installing MDriven Server on Windows|Installing MDriven Server on Windows.]] | |||
== Setting Up on Azure == | |||
To start setting up your Turnkey application, go to [https://portal.azure.com '''https://portal.azure.com'''] and log in under your existing account or create the new one. | |||
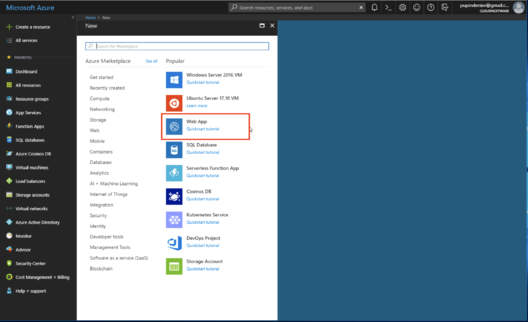
First, you need to create a '''new Web app''' to run your Turnkey application. | |||
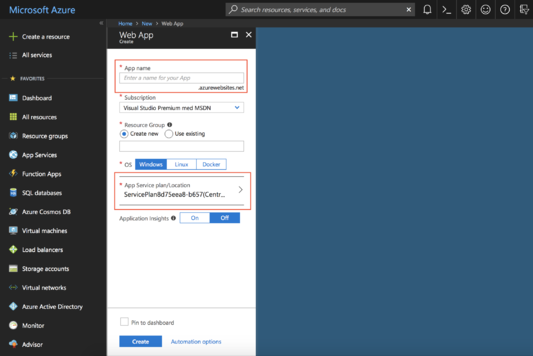
[[File:Create new Web app.png|none|thumb|528x528px|Create a new Web app on Azure]]Enter the name of your application and create or choose an existing App Services Plan. | |||
[[File:Name your app and choose App Services Plan.png|none|thumb|533x533px|Name your app and choose App Services Plan]] | |||
Now, we need to add a virtual directory, because two applications (MDriven Server & MDriven Turnkey) are running on one site. | |||
Go to "'''Application Settings'''" and scroll down to "'''Virtual applications and directories'''" and create another application called “__MDrivenServer” (double underscore). | |||
Don't forget to make sure the __MDrivenServer is an application of its own (the application check box next to the folder name must be checked). | |||
[[File:Create another webapp called " MDrivenServer".png|none|thumb|685x685px|Create another web app called "__MDrivenServer"]] | |||
Now, we need to download the publish profile - go to "'''Overview'''" and press "'''Get publish profile'''". | |||
[[File:Get publish profile from Azure.png|none|thumb|690x690px|Get the publish profile from Azure]] | |||
When all these steps are done, we are ready to go to [https://portal.mdriven.net '''https://portal.mdriven.net'''] | |||
'''Note:''' It is best to do at least the first deploy with Portal (as described below) since you then get the strong password set and init files updated for your installation - but after initial setup, you can easily deploy new code for Turnkey + server via OneDrive as described here: [[Deploy_Turnkey_on_your_own_Azure_with_OneDrive]] | |||
== Setting Up on MDriven Portal == | |||
Open https://portal.mdriven.net and log in under your account. | |||
Go to "'''Views"''' -> "'''Show my Turnkey Sites"''' and "'''Register a New Site"'''. | |||
Name your application and upload the publish profile to MDriven Portal and press "Create Turnkey Site" and "Save". | |||
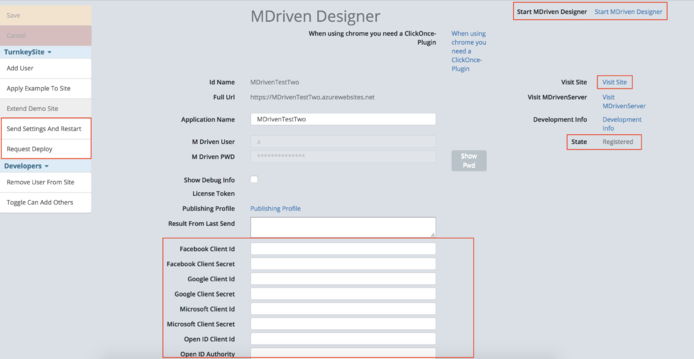
Now, go back to "Show my Turnkey Sites" where you can see that your new site is registered, but not deployed. Click on it and choose "Manage Turnkey Site". | |||
[[File:Manage your Site page.png|none|thumb|694x694px|Manage your site from MDriven Portal]] | |||
On the "Manage" page, you can request a deploy of your website. To request deploy, you need to press the "Request Deploy" button and save it. Deploy takes no more than 5 minutes. When the status of your site changes to "Deployed", press "Send Settings and Restart" and save. | |||
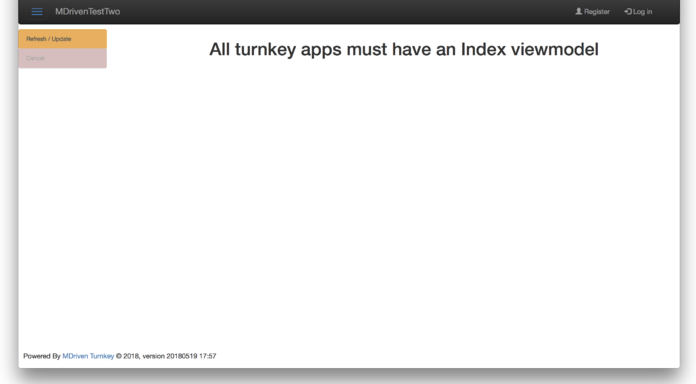
After these steps, you can revisit your site and see your Turnkey application. | |||
[[File:First look of Turnkey app.png|none|thumb|696x696px|First look at the Turnkey app]] | |||
'''Note!''' Each Turnkey app must have an Index ViewModel. | |||
You can go back to https://portal.mdriven.net/ and open MDriven Designer to start modeling. | |||
== Video Tutorial == | |||
<html> | |||
<p class="video-warn"> | |||
To make your experience smooth, we set the main tags mentioned in the video to the right bar menu of this mini-player. Choose an interesting subtitle on the list and immediately get to the exact theme navigation item place in the video. Now you can pick any topic to be instructed on without watching the whole video. | |||
</p> | |||
<div class="video"> | |||
<div class="video__wrapper"> | |||
<iframe src="https://www.youtube.com/embed/mVVCsM09vXE?rel=0&autoplay=0" frameborder="0" allowfullscreen></iframe> | |||
</div> | |||
<div class="video__navigation"> | |||
<span class="navigation-item" data-video="mVVCsM09vXE" data-start="0" tabindex="0"> Setting up MDriven Turnkey on Microsoft Azure </span> | |||
<span class="navigation-item" data-video="mVVCsM09vXE" data-start="33" tabindex="0"> Setting up on Microsoft Azure </span> | |||
<span class="navigation-item" data-video="mVVCsM09vXE" data-start="287" tabindex="0"> Setting up on MDriven Portal </span> | |||
</div> | |||
</div> | |||
</html>The MDriven Book - See: [[Set up MDriven Turnkey on premise]] | |||
[[Category:MDriven Turnkey]] | |||
[[Category:Installation]] | |||
[[Category:Tutorial]] | |||
Revision as of 07:02, 9 January 2024
This tutorial will help you set up MDriven Turnkey on Microsoft Azure.
All the components needed to run MDriven Turnkey (the latest versions of MDriven Server & MDriven Turnkey) are available here for MDrivenServer and here for MDrivenTurnkey - you will need both.
You can run MDriven Turnkey on your Azure account or set it up on your local IIS. To set up on a local IIS, see Installing MDriven Server on Windows.
Setting Up on Azure
To start setting up your Turnkey application, go to https://portal.azure.com and log in under your existing account or create the new one.
First, you need to create a new Web app to run your Turnkey application.
Enter the name of your application and create or choose an existing App Services Plan.
Now, we need to add a virtual directory, because two applications (MDriven Server & MDriven Turnkey) are running on one site.
Go to "Application Settings" and scroll down to "Virtual applications and directories" and create another application called “__MDrivenServer” (double underscore).
Don't forget to make sure the __MDrivenServer is an application of its own (the application check box next to the folder name must be checked).
Now, we need to download the publish profile - go to "Overview" and press "Get publish profile".
When all these steps are done, we are ready to go to https://portal.mdriven.net
Note: It is best to do at least the first deploy with Portal (as described below) since you then get the strong password set and init files updated for your installation - but after initial setup, you can easily deploy new code for Turnkey + server via OneDrive as described here: Deploy_Turnkey_on_your_own_Azure_with_OneDrive
Setting Up on MDriven Portal
Open https://portal.mdriven.net and log in under your account.
Go to "Views" -> "Show my Turnkey Sites" and "Register a New Site".
Name your application and upload the publish profile to MDriven Portal and press "Create Turnkey Site" and "Save".
Now, go back to "Show my Turnkey Sites" where you can see that your new site is registered, but not deployed. Click on it and choose "Manage Turnkey Site".
On the "Manage" page, you can request a deploy of your website. To request deploy, you need to press the "Request Deploy" button and save it. Deploy takes no more than 5 minutes. When the status of your site changes to "Deployed", press "Send Settings and Restart" and save.
After these steps, you can revisit your site and see your Turnkey application.
Note! Each Turnkey app must have an Index ViewModel.
You can go back to https://portal.mdriven.net/ and open MDriven Designer to start modeling.
Video Tutorial
To make your experience smooth, we set the main tags mentioned in the video to the right bar menu of this mini-player. Choose an interesting subtitle on the list and immediately get to the exact theme navigation item place in the video. Now you can pick any topic to be instructed on without watching the whole video.
The MDriven Book - See: Set up MDriven Turnkey on premise


