Multiple file upload component
mNo edit summary |
mNo edit summary |
||
| Line 7: | Line 7: | ||
{| class="wikitable" style="border: none" | {| class="wikitable" style="border: none" | ||
|- | |- | ||
| [[File:Upload_multiplefiles_project_document.png]] | | [[File:Upload_multiplefiles_project_document.png|300px]] | ||
| [[File:Upload_multiplefiles_document.png]] | | [[File:Upload_multiplefiles_document.png]] | ||
|} | |} | ||
| Line 16: | Line 16: | ||
* '''Create a variable''' (here named vUploadFileTarget). It should be of a type that could store a file (blob). In this example we choose the Document type. This variable will be used to temporary store each file since we are limited to one single upload at a time. | * '''Create a variable''' (here named vUploadFileTarget). It should be of a type that could store a file (blob). In this example we choose the Document type. This variable will be used to temporary store each file since we are limited to one single upload at a time. | ||
[[File:Upload multiplefiles_create_variable_withroot.png]] | [[File:Upload multiplefiles_create_variable_withroot.png|400px]] | ||
* '''Add a view model column named AttachmentUploadTarget''' with the value of the file part of your variable (here vUploadFileTarget.File). The name here will be used in the component code. We create a view model column to be able to handle it in the component client code. | |||
* '''Add a view model column named AttachmentUploadTarget_FileName''' with the value of the string part of your variable (here vUploadFileTarget.FileName). The _FileName suffix is important since there is a MDriven "magic" that, when uploading a file, will look for a column with the same name as referenced but with a "_FileName" suffix and if such a column exists it will assign the filename to it. Thus, this part is optional, but if you skip it you will lose the name of the file. | |||
[[File:Upload_multiplefiles_AttachmentUploadTarget_columns.png|400px]] | |||
Revision as of 09:39, 6 March 2020
It is easy to add a single file upload button in the MDriven Designer, but to handle multiple files you'll have to create a component.
Model for this example
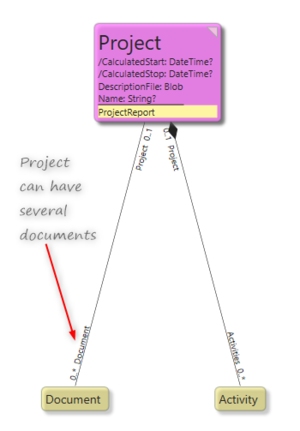
The model for the example is a project with some documents. Each document holds the file (a blob) and a filename (a string). The goal is to make it possible to choose several documents in the file browser and upload all of them.

|

|
Setting up the ViewModel
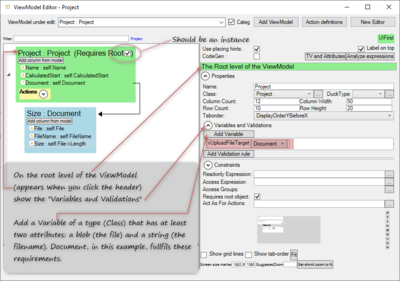
- Create a view model. It should have a root, which in this case should be a project. The project holds the list / container of documents. We will need the ID of the view model class.
- Create a variable (here named vUploadFileTarget). It should be of a type that could store a file (blob). In this example we choose the Document type. This variable will be used to temporary store each file since we are limited to one single upload at a time.
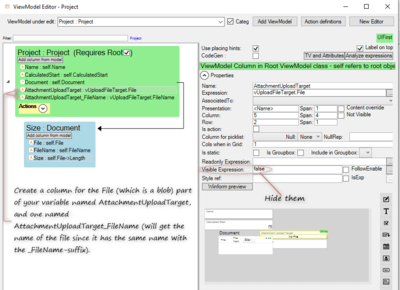
- Add a view model column named AttachmentUploadTarget with the value of the file part of your variable (here vUploadFileTarget.File). The name here will be used in the component code. We create a view model column to be able to handle it in the component client code.
- Add a view model column named AttachmentUploadTarget_FileName with the value of the string part of your variable (here vUploadFileTarget.FileName). The _FileName suffix is important since there is a MDriven "magic" that, when uploading a file, will look for a column with the same name as referenced but with a "_FileName" suffix and if such a column exists it will assign the filename to it. Thus, this part is optional, but if you skip it you will lose the name of the file.
This page was edited 0 days ago on 05/17/2024. What links here


