No edit summary |
No edit summary |
||
| Line 1: | Line 1: | ||
== Do | == Do You Want to Debug Turnkey or Add Code and Pages to Your App? == | ||
This article helps you set up the environment for local development and debugging of | This article helps you set up the environment for local development and debugging of the MDriven Turnkey application in Visual Studio. | ||
'''Note!''' This is for running the Turnkey server locally, not just moving your model from the Designer to Visual Studio and using code. If you want | '''Note!''' This is for running the Turnkey server locally, not just moving your model from the Designer to Visual Studio and using code. If you want a simpler way of adding C# code and cshtml pages to your Turnkey application, look first at [[CodeDress]]. | ||
== Download MDriven Turnkey == | == Download MDriven Turnkey == | ||
To start developing your Turnkey Application locally in Visual Studio you need to download the latest version of MDriven Turnkey from | To start developing your Turnkey Application locally in Visual Studio, you need to download the latest version of MDriven Turnkey from the MDriven site. [https://mdriven.net/turnkey Download link]. Then unzip the downloaded archive. | ||
== Setting Up Visual Studio == | == Setting Up Visual Studio == | ||
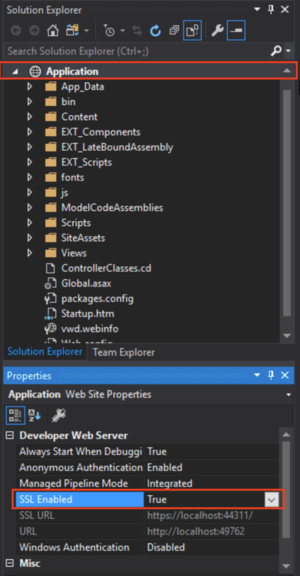
Open downloaded MDriven Turnkey in Visual Studio. You need to choose option "'''Open -> Web Site'''" and choose "Application" folder which was extracted from the downloaded archive | Open the downloaded MDriven Turnkey in Visual Studio. You need to choose the option "'''Open -> Web Site'''" and choose the "Application" folder which was extracted from the downloaded archive. Choose your Application in the Solution Explorer and '''enable SSL''' in the "Properties" window below. | ||
[[File:Eneble SSL.png|thumb|Enable SSL for the application|none]] | [[File:Eneble SSL.png|thumb|Enable SSL for the application|none]] | ||
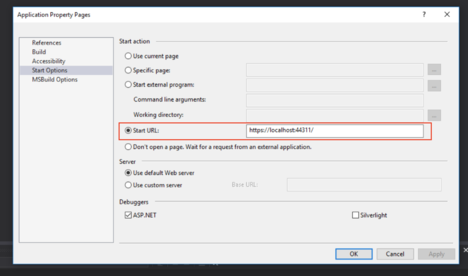
When SSL is enabled, copy '''SSL Url''' and paste it to "'''Start options'''" in "'''Start Url'''" field ''(Right-click on Application in Solution Explorer)''. | When SSL is enabled, copy '''SSL Url''' and paste it to "'''Start options'''" in the "'''Start Url'''" field ''(Right-click on Application in Solution Explorer)''. | ||
[[File:SSL Url in Start Options.png|none|thumb|468x468px|Paste SSL Url in "Start options"]] | [[File:SSL Url in Start Options.png|none|thumb|468x468px|Paste SSL Url in "Start options"]] | ||
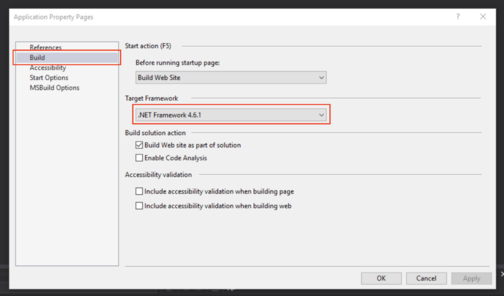
Also, | Also, check that you will build the application with the '''correct version of .NET Framework'''. | ||
[[File:Check correct version of .NET.png|none|thumb|504x504px|Check version of .NET Framework]] | [[File:Check correct version of .NET.png|none|thumb|504x504px|Check the version of .NET Framework]] | ||
== Connect | == Connect With the Data and Model in the Cloud == | ||
To connect your local MDriven Turnkey copy with data and model in the cloud open '''MDrivenServerOverride - NotInEffect.xml''' | To connect your local MDriven Turnkey copy with data and model in the cloud, open '''MDrivenServerOverride - NotInEffect.xml''' | ||
[[File:Add an url and password to your MDriven Server.png|none|thumb|781x781px|Add | [[File:Add an url and password to your MDriven Server.png|none|thumb|781x781px|Add a URL and password to your MDriven Server]] | ||
When it's done rename '''MDrivenServerOverride - NotInEffect.xml''' to -> '''MDrivenServerOverride.xml''' and '''TurnkeySettings - NotInEffect.xml''' to -> '''[[TurnkeySettings]].xml ,''' then you can build your application and start | When it's done, rename '''MDrivenServerOverride - NotInEffect.xml''' to -> '''MDrivenServerOverride.xml''' and '''TurnkeySettings - NotInEffect.xml''' to -> '''[[TurnkeySettings]].xml,''' then you can build your application and start debugging. | ||
== View Override == | == View Override == | ||
Revision as of 07:35, 13 February 2023
Do You Want to Debug Turnkey or Add Code and Pages to Your App?
This article helps you set up the environment for local development and debugging of the MDriven Turnkey application in Visual Studio.
Note! This is for running the Turnkey server locally, not just moving your model from the Designer to Visual Studio and using code. If you want a simpler way of adding C# code and cshtml pages to your Turnkey application, look first at CodeDress.
Download MDriven Turnkey
To start developing your Turnkey Application locally in Visual Studio, you need to download the latest version of MDriven Turnkey from the MDriven site. Download link. Then unzip the downloaded archive.
Setting Up Visual Studio
Open the downloaded MDriven Turnkey in Visual Studio. You need to choose the option "Open -> Web Site" and choose the "Application" folder which was extracted from the downloaded archive. Choose your Application in the Solution Explorer and enable SSL in the "Properties" window below.
When SSL is enabled, copy SSL Url and paste it to "Start options" in the "Start Url" field (Right-click on Application in Solution Explorer).
Also, check that you will build the application with the correct version of .NET Framework.
Connect With the Data and Model in the Cloud
To connect your local MDriven Turnkey copy with data and model in the cloud, open MDrivenServerOverride - NotInEffect.xml
When it's done, rename MDrivenServerOverride - NotInEffect.xml to -> MDrivenServerOverride.xml and TurnkeySettings - NotInEffect.xml to -> TurnkeySettings.xml, then you can build your application and start debugging.
View Override
Now, you can change the regular view of page. You just need to find name of ViewModel which you want to override, then create a new file with .cshtml extension in Views -> EXT_OverridePages. Notice! You must name the new file exactly like a name of existing ViewModel which you want to override. (For example, if you have a ViewModel called "TimeManage", your file for overriding this page must be called TimeManage.cshtml). For start you can use a default template of page from AngularPageDynamicTemplate.cshtml (Views -> Turnkey) and copy it in your new page override file. See more about View override.
Video Tutorial
To make your experience more comfortable, we set the main tags mentioned in the video to the right bar menu of this mini player. Choose the interesting subtitle on the list and immediately get to the exact theme timeplace in the video. Now you can pick any topic to be instructed without watching the whole video.
In this session we set up the environment for local development and debugging in visual studio - still using the data and model in the cloud. We also replace one of the standard views from inside VS.
In this session we show how you bind to things in your view models with angular to completely take control of all rendering with html5. Continue where we left off having MDriven turnkey in Visual Studio for local development.


