No edit summary |
No edit summary |
||
| Line 70: | Line 70: | ||
That takes care of test data for Cars and Brands. I still have these two items: | That takes care of test data for Cars and Brands. I still have these two items: | ||
Note to self: I must bring up “search for customer" on "assign customer" – then let user pick 1 customer | Note to self: I must bring up “search for customer" on "assign customer" – then let the user pick 1 customer to return back with and set on the "rental contract”. | ||
Note to self | Note to self: I must do the same for "assign car" – I must bring up "search for cars". | ||
I do this by adding a ViewModelAction for the ViewOrEditRentalContract: | I do this by adding a ViewModelAction for the ViewOrEditRentalContract: | ||
[[File:Prototyping - 17.png|none|frame|444x444px]] | [[File:Prototyping - 17.png|none|frame|444x444px]] | ||
The Action should bring up the search for Customer | The Action should bring up the search for Customer. It should be a modal action and be fine to press "ok" once a Customer is selected. When Ok is executed, we assign the picked customer to our rental contract. | ||
The same more or less for picking a car: | The same more or less for picking a car: | ||
| Line 85: | Line 85: | ||
[[File:Prototyping - 19.png|none|frame|439x439px]] | [[File:Prototyping - 19.png|none|frame|439x439px]] | ||
I also | I also have this one left: | ||
Yet another | Note to self: I must have a Search for rental contracts. | ||
Yet another ViewModel. Once I have it done, I use the shortcut action to create a global action to show it: | |||
[[File:Prototyping - 20.png|none|frame|438x438px]] | [[File:Prototyping - 20.png|none|frame|438x438px]] | ||
Then I press Play again: | Then I press Play again: | ||
This time I can assign a Customer and assign a Car. The search for Car comes up in with an Ok/Cancel button because it was brought up by a modal action: | This time, I can assign a Customer and assign a Car. The search for Car comes up in with an Ok/Cancel button because it was brought up by a modal action: | ||
[[File:Prototyping - 21.png|none|frame|431x431px]] | [[File:Prototyping - 21.png|none|frame|431x431px]] | ||
I search | I search, pick a car, and press ok: | ||
[[File:Prototyping - 22.png|none|frame|460x460px]] | [[File:Prototyping - 22.png|none|frame|460x460px]] | ||
I still have a few user stories left | I still have a few user stories left. I will need to change the model somewhat, amend the ViewModels a bit, and maybe create some actions. All in all, this is a very straightforward way to work. You get instant gratification when you see your model and logic come to life. This is something that will also trigger ideas for further things your users will need or want. Churn on like this for an hour or two and you will have done more than what you would do in a day with traditional specification work or coding. | ||
== The | == The Look == | ||
The prototyper window uses Windows Presentation Foundation (WPF) | The prototyper window uses Windows Presentation Foundation (WPF). You are free to change the used style sheet as you see fit: | ||
[[File:Prototyping - 23.png|none|frame|488x488px]] | [[File:Prototyping - 23.png|none|frame|488x488px]] | ||
Or | Or: | ||
[[File:Prototyping - 24.png|none|frame|493x493px]] | [[File:Prototyping - 24.png|none|frame|493x493px]] | ||
Or maybe you need to stress that you are “just prototyping” by using something really bubbly: | |||
[[File:Prototyping - 25.png|none|frame|501x501px]] | [[File:Prototyping - 25.png|none|frame|501x501px]] | ||
== Available Actions == | == Available Actions == | ||
The actions that are shown to the left are calculated by the framework. You can have class | The actions that are shown to the left are calculated by the framework. You can have class actions – actions associated with a class in your model. These will show up whenever an object of that class is shown in your view. | ||
You can also have | You can also have ViewModel actions and these only show up in the view they are defined for. | ||
We have the ability to instruct the logic to | We have the ability to instruct the logic to make exceptions for the calculated display of actions. We can opt out of the presentation of actions per view. | ||
Actions may be used for navigation | Actions may be used for navigation, but they may also perform something – like calling a method on an object. | ||
In our example we already have some actions – both | In our example, we already have some actions – both ViewModel actions, class actions and global actions (the ones that build up the main menu). | ||
[[File:Prototyping - 26.png|none|frame|482x482px]] | [[File:Prototyping - 26.png|none|frame|482x482px]] | ||
Look | Look closely at the ShowRentalContract action. This is a class action – available everywhere a RentalContract is shown. However, there are situations where we do not want it to show – like when we already are in the view that is brought up by the action: | ||
[[File:Prototyping - 27.png|none|frame|492x492px]] | [[File:Prototyping - 27.png|none|frame|492x492px]] | ||
To remove it, we want to opt out. | |||
There are two tools in MDrivenDesigner that are good to use for this. The first one is the ViewModelEditor: | There are two tools in MDrivenDesigner that are good to use for this. The first one is the ViewModelEditor: | ||
[[File:Prototyping - 28.png|none|frame|503x503px]] | [[File:Prototyping - 28.png|none|frame|503x503px]] | ||
Pressing the “>” button will move it to the | Pressing the “>” button will move it to the optout column: | ||
[[File:Prototyping - 29.png|none|frame|254x254px]] | [[File:Prototyping - 29.png|none|frame|254x254px]] | ||
You can press the “<” to opt | You can press the “<” to opt in again. | ||
The other place | The other place you can opt out of actions from is the Action Cross Reference window: | ||
[[File:Prototyping - 30.png|none|frame|464x464px]] | [[File:Prototyping - 30.png|none|frame|464x464px]] | ||
[[File:Prototyping - 31.png|none|frame|501x501px]] | [[File:Prototyping - 31.png|none|frame|501x501px]] | ||
In this window we see the actions that will bring this view up | In this window, we see the actions that will bring this view up. Currently, there are 2 actions: the NewRentalContract and the ShowRentalContract. | ||
We also see the actions that will show and | We also see the actions that will show and a line to which section or nesting of the ViewModel it refers. You may click the lines and shift them from green (opt in default) to opt out. Since we already opted out of our ShowRentalContract from this view, that line is already red. | ||
There are also tools for looking at this from a specific | There are also tools for looking at this from a specific action perspective. In the ActionsEditor, we see this for the ShowRentalContract Action: | ||
[[File:Prototyping - 32.png|none|frame]] | [[File:Prototyping - 32.png|none|frame]] | ||
| Line 149: | Line 151: | ||
[[File:Prototyping - 33.png|none|frame|523x523px]] | [[File:Prototyping - 33.png|none|frame|523x523px]] | ||
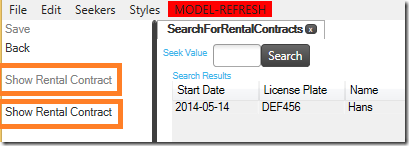
Here we see that it is opt out in the ViewAndEditRentalContract view, but it shows 2 times in the SearchForRentalContracts view. I switch back to prototyping to verify this: | |||
[[File:Prototyping - 34.png|none|frame]] | [[File:Prototyping - 34.png|none|frame]] | ||
And find that this is true. The reason for this is the fact that this | And find that this is true. The reason for this is the fact that this ViewModel defines two areas that have the type RentalContract: one for the root and one for the Grid-nesting that shows the results from the variable vSeekerResult. | ||
[[File:Prototyping - 35.png|none|frame]] | [[File:Prototyping - 35.png|none|frame]] | ||
The root instance will always be null since this ViewModel does not require a root object to function. ViewModels designed for seeking seldom do. If it always will be null then there is little point | The root instance will always be null since this ViewModel does not require a root object to function. ViewModels designed for seeking seldom do. If it always will be null then there is little point in having an action that will be enabled only if it is assigned to an object. We should opt that root action out. Click the line to toggle the opt out state: | ||
[[File:Prototyping - 36.png|none|frame|455x455px]] | [[File:Prototyping - 36.png|none|frame|455x455px]] | ||
The ActionEditor was updated as well: | |||
[[File:Prototyping - 37.png|none|frame|465x465px]] | [[File:Prototyping - 37.png|none|frame|465x465px]] | ||
It now says shows in 1 place – 2 opted out. | It now says the Action shows in 1 place – 2 opted out. | ||
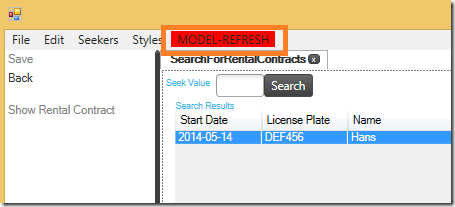
I | I have had my prototyping session running all along – but it still uses the model we had prior to our changes. I can now restart the prototyping by clicking play again, bringing up a new prototype window. Or I can just reread the model to the one I have. I see that the ShowRentalContract action is shown only once. | ||
[[File:Prototyping - 38.png|left|frame]] | [[File:Prototyping - 38.png|left|frame]] | ||
If you are alone for a day and you have lots of ideas, I assure you that you can model them in MDriven Designer and verify them in MDriven prototyper. When you are able to try and verify ideas rapidly, you will find many “think bugs” early. Bugs that make you say things like: “Oh, no – that is not a good way of doing it!”. Since the MDriven environment works as your autopilot and it has tens of thousands of flight hours under its belt, you will be freer in the creative part of your work. | |||
If you are | |||
[[Category:Prototyping]] | [[Category:Prototyping]] | ||
[[Category:View Model]] | [[Category:View Model]] | ||
[[Category:MDriven Designer]] | [[Category:MDriven Designer]] | ||
Revision as of 08:19, 3 February 2023
Prototyping is used in all lines of engineering. Prototyping is the process where you whip something together quickly as a mock-up in order to show or test it in order to learn something that otherwise would be hard to know.
Prototyping for software has a unique position. The prototype is made up of the same stuff as the finished product: logical rules. This is not true for any other practice of engineering. We have a unique position that we can harvest to make the real deal – the finished product – just as easy as if we were building a prototype. Many experienced developers frown at this. They know how prudent you must be to build something robust and solid. They also know how quick and dirty the prototype is when you're whipping it together.
Why does this big gap exist? My answer: normal coding leaves too many degrees of freedom for the task at hand. Normal coding uses only one tool – code – for handling, presenting, and navigating data. Of course, you will mix things up when you are in a hurry.
If we can separate things like the information we handle, from the transformation of that information into views and from the navigation between these views – then we have something that will almost fly on its own – and building something will be like prototyping it. Think of it as an autopilot. It will protect you against making stupid mistakes, help you fly straight, and give you time to talk on the radio or more – you only need to tell it where you want to fly.
With MDriven, we use the Model to tell the autopilot what information to handle, what the perspectives of the information should be, and how we navigate between the views of information. Having instructed the autopilot, we can take off and see if we have the right model or not. If not, churn away and fix it.
Many developers also frown at the idea of autopilot since it will emasculate them and stop them from flexing their muscles. I need to point out that what makes MDrivenFramework great is that you can turn off the autopilot for any portion of the flight so to speak. You can still do the coolest looping in front of a gaping audience whenever you feel like it, before turning on autopilot to do the mundane flight back home. This will give you freedom, speed, and fewer accidents.
This is How You Do It With MDriven
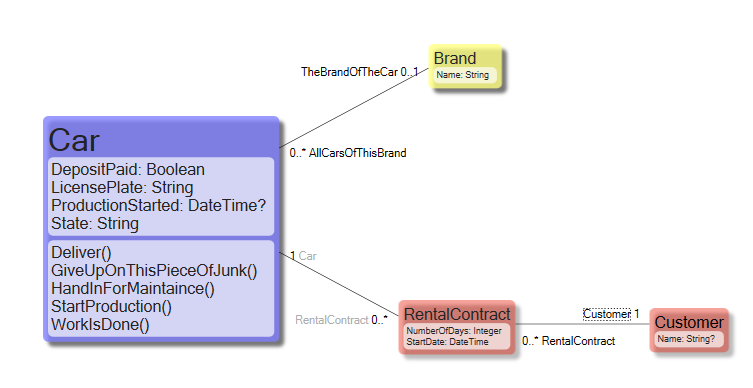
1. Model what you know so far. In the example below, I am prototyping for a Car Rental Service.
2. Think about what user stories or requirements you have:
As a Customer, I want to see what cars you can rent.
As a Customer, I want to know what they cost per day and what my total cost will be.
As a Rental worker, I want to be able to hand customers rental contracts to sign.
As a Rental worker, I want to be able to find free cars.
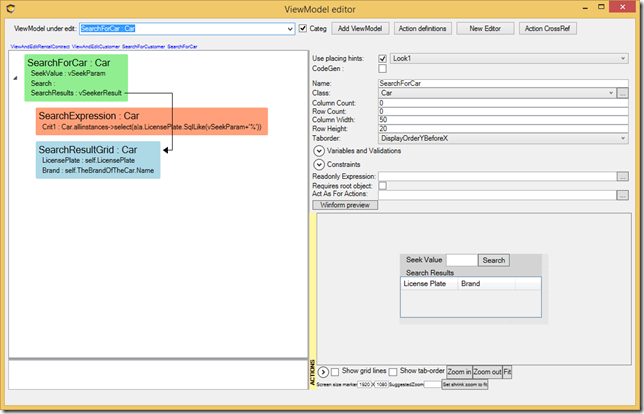
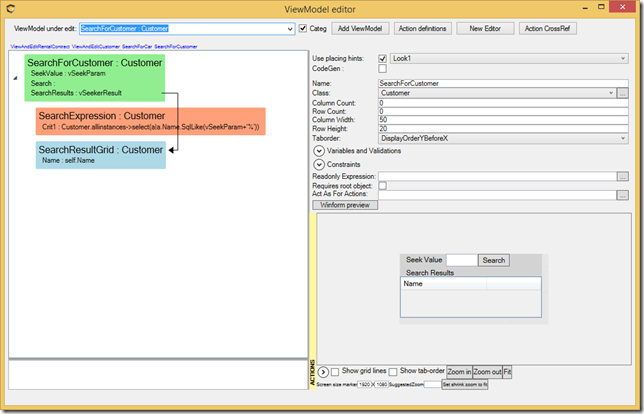
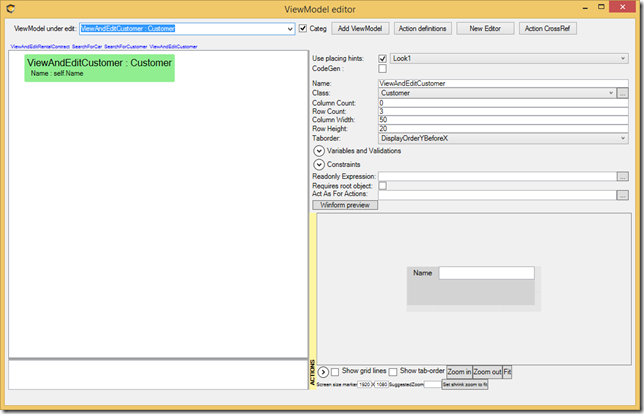
3. Then, create some ViewModels that can cover these user stories. When prototyping, I make use of the scaffolding user interface hints that place out UI controls on a screen surface that match the types of the Viewmodels properties. I end up with 4 ViewModels:
Search for a Car:
Search for a Customer:
View or edit a customer:
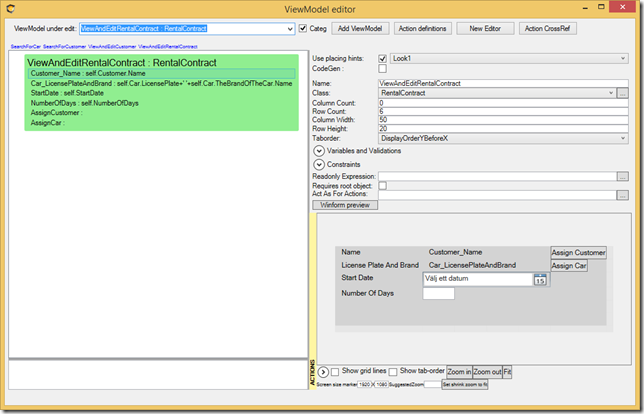
View or edit a Rental contract:
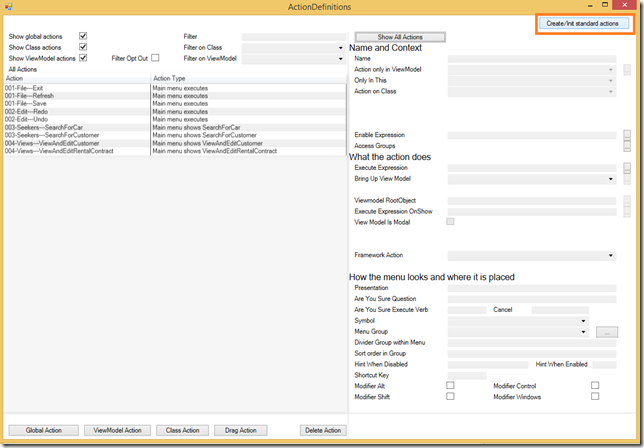
4. What actions do we need to expose to the user for navigation between these views? For this, I will start by clicking Create/Init standard actions in the ActionsDefinition dialog.
This gives me ordinary actions like save, quit, undo, and redo. It also picks up on the ViewModels I have and adds some actions for them.
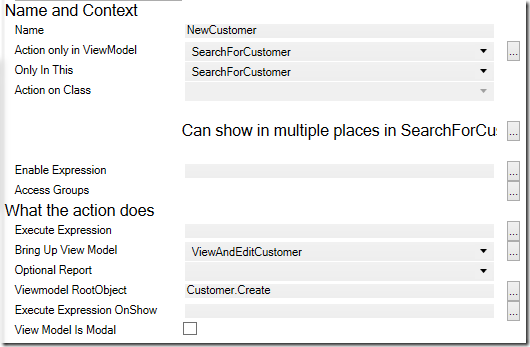
I will remove the actions created for ViewAndEditCustomer and ViewAndEditRentalContract since these are rooted views that require a root object (a customer or a Rental contract) to have something to show. Instead, I add a ViewModelActions in the SearchForCustomer ViewModel that creates a new Customer and one that creates new rental contracts:
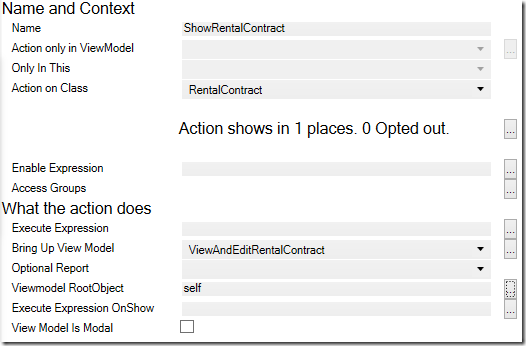
I also add class actions that can show an existing customer and rental contract:
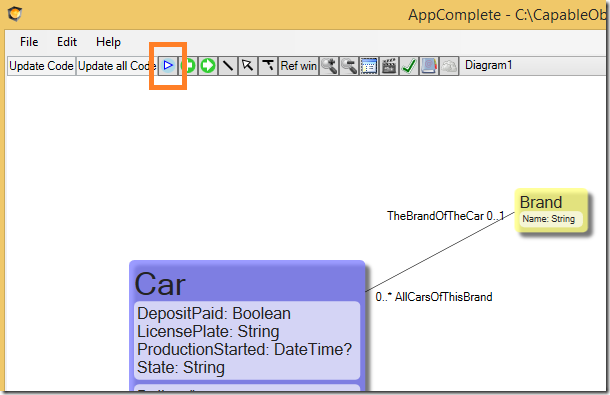
6. I could think a bit harder, but the whole point with prototyping is that it should be easy to test if we are done or not. So I hit the start prototype symbol:
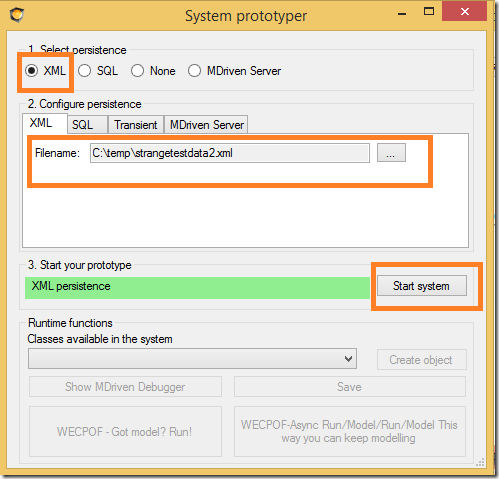
I am presented with a choice on how to store data for this prototype. We will choose XML for starters:
I start the prototype and find the main menu items:
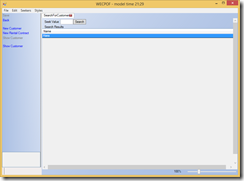
I pick “Search for customers” and I search. When the system finds none, I click the action new customer and I get the ViewAndEditCustomer view. I enter a name and save and click 'back'. Now, the search result sees a customer:
Note to self: I must have a Search for rental contracts.
I create a new rental contract and notice that the button “Assign customer” does nothing.
Note to self: I must bring up “Search for Customer" on "Assign Customer" and let the user pick 1 customer to return back with and set them on the "rental contract”.
Note to self: I must do the same for "Assign Car" and bring up "Search for cars".
Note to self: I do not have any data for cars or brands and no UI to enter it with.
Note to self: I should do this in the debugger window for now.
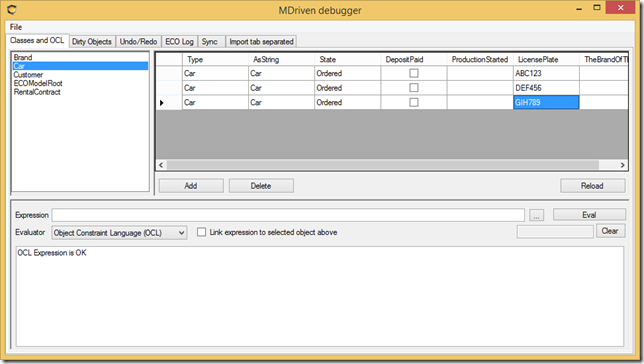
This is how a typical prototyping session goes and how it reveals the obvious things we need to do. Let's do them now. Start with using the debugger for adding cars and brands:
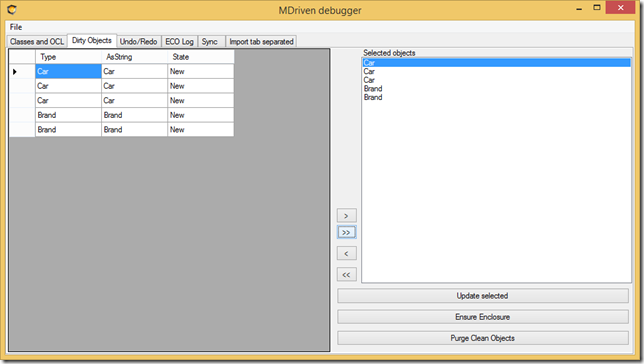
I add a brand as well then save the data to the prototyping XML file by switching to dirty objects:
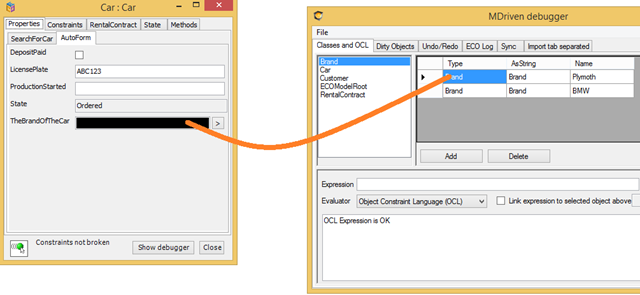
I click to open the Autoform of a Car-object. I drag a Brand object to the Brand field:
That takes care of test data for Cars and Brands. I still have these two items:
Note to self: I must bring up “search for customer" on "assign customer" – then let the user pick 1 customer to return back with and set on the "rental contract”.
Note to self: I must do the same for "assign car" – I must bring up "search for cars".
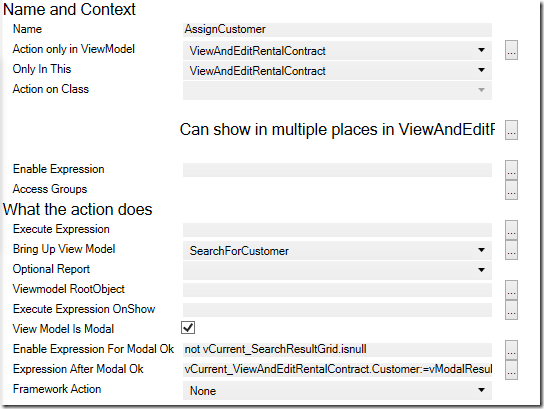
I do this by adding a ViewModelAction for the ViewOrEditRentalContract:
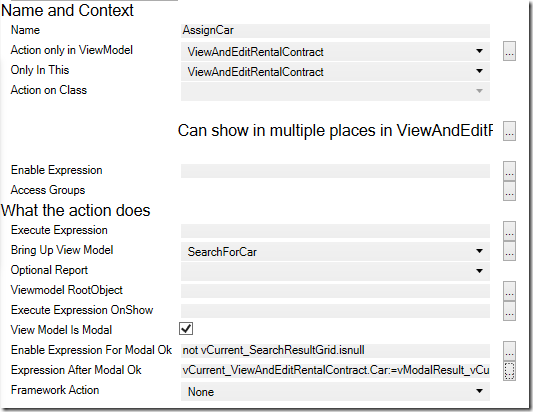
The Action should bring up the search for Customer. It should be a modal action and be fine to press "ok" once a Customer is selected. When Ok is executed, we assign the picked customer to our rental contract.
The same more or less for picking a car:
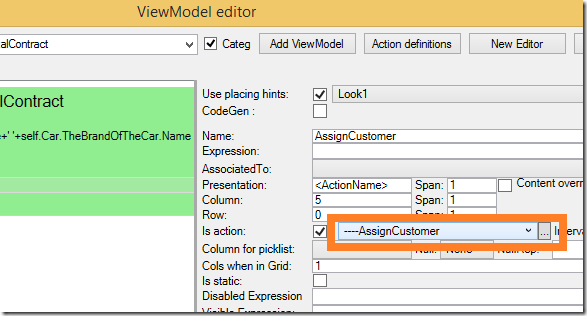
I then choose to hook these actions up to the buttons I put in the ViewModel:
I also have this one left:
Note to self: I must have a Search for rental contracts.
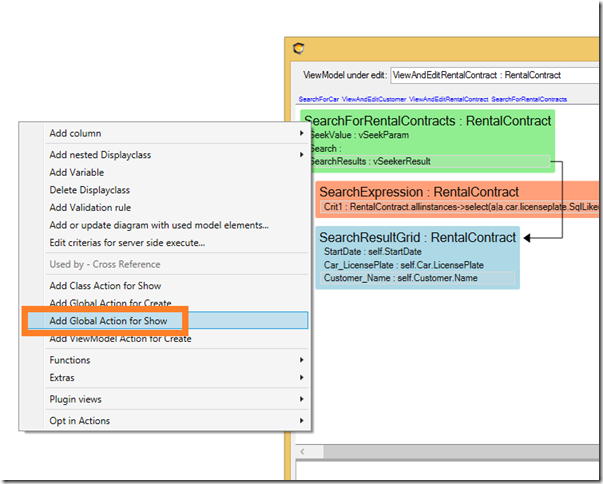
Yet another ViewModel. Once I have it done, I use the shortcut action to create a global action to show it:
Then I press Play again:
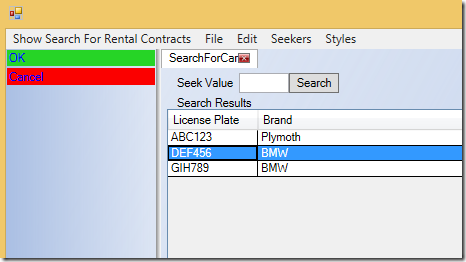
This time, I can assign a Customer and assign a Car. The search for Car comes up in with an Ok/Cancel button because it was brought up by a modal action:
I search, pick a car, and press ok:
I still have a few user stories left. I will need to change the model somewhat, amend the ViewModels a bit, and maybe create some actions. All in all, this is a very straightforward way to work. You get instant gratification when you see your model and logic come to life. This is something that will also trigger ideas for further things your users will need or want. Churn on like this for an hour or two and you will have done more than what you would do in a day with traditional specification work or coding.
The Look
The prototyper window uses Windows Presentation Foundation (WPF). You are free to change the used style sheet as you see fit:
Or:
Or maybe you need to stress that you are “just prototyping” by using something really bubbly:
Available Actions
The actions that are shown to the left are calculated by the framework. You can have class actions – actions associated with a class in your model. These will show up whenever an object of that class is shown in your view.
You can also have ViewModel actions and these only show up in the view they are defined for.
We have the ability to instruct the logic to make exceptions for the calculated display of actions. We can opt out of the presentation of actions per view.
Actions may be used for navigation, but they may also perform something – like calling a method on an object.
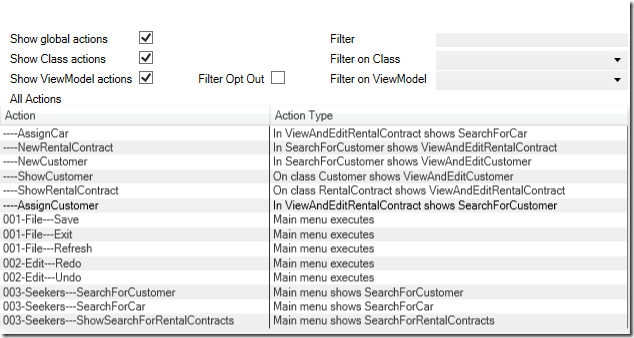
In our example, we already have some actions – both ViewModel actions, class actions and global actions (the ones that build up the main menu).
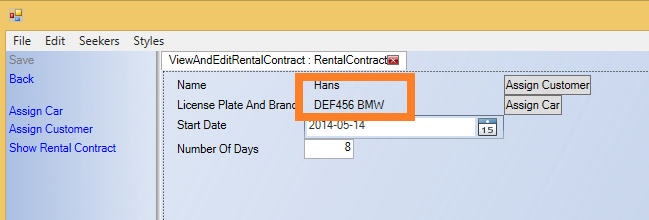
Look closely at the ShowRentalContract action. This is a class action – available everywhere a RentalContract is shown. However, there are situations where we do not want it to show – like when we already are in the view that is brought up by the action:
To remove it, we want to opt out.
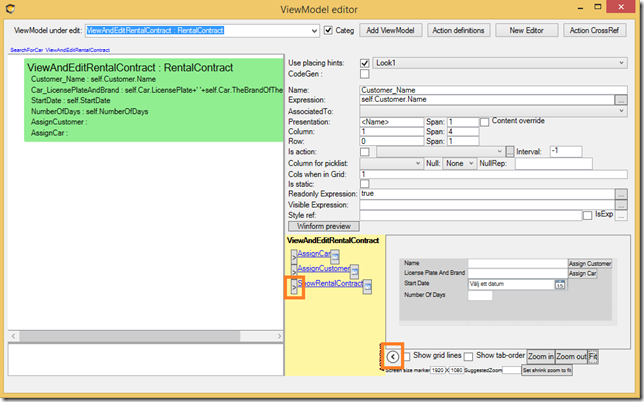
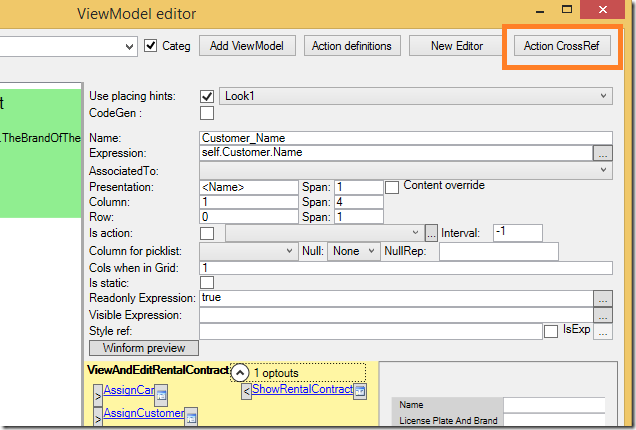
There are two tools in MDrivenDesigner that are good to use for this. The first one is the ViewModelEditor:
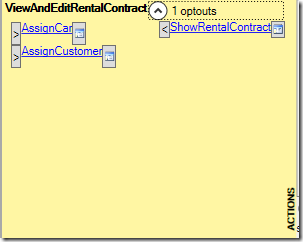
Pressing the “>” button will move it to the optout column:
You can press the “<” to opt in again.
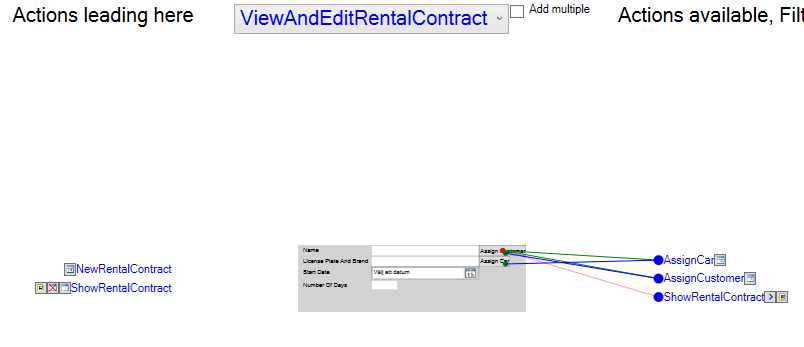
The other place you can opt out of actions from is the Action Cross Reference window:
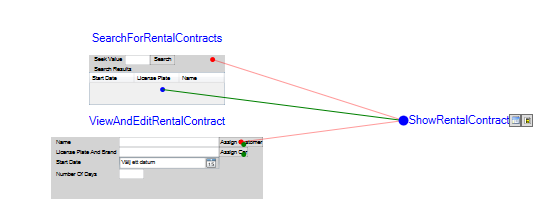
In this window, we see the actions that will bring this view up. Currently, there are 2 actions: the NewRentalContract and the ShowRentalContract.
We also see the actions that will show and a line to which section or nesting of the ViewModel it refers. You may click the lines and shift them from green (opt in default) to opt out. Since we already opted out of our ShowRentalContract from this view, that line is already red.
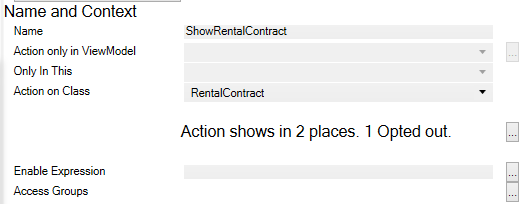
There are also tools for looking at this from a specific action perspective. In the ActionsEditor, we see this for the ShowRentalContract Action:
It says “Action shows in 2 places. 1 Opted out” followed by a dialog button. Click that and you will see this:
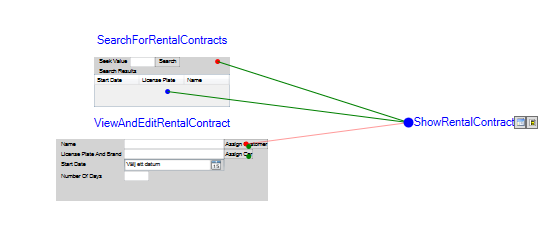
Here we see that it is opt out in the ViewAndEditRentalContract view, but it shows 2 times in the SearchForRentalContracts view. I switch back to prototyping to verify this:
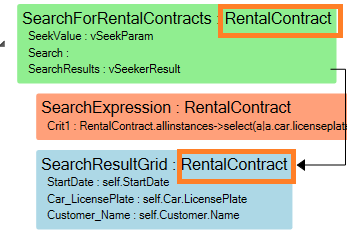
And find that this is true. The reason for this is the fact that this ViewModel defines two areas that have the type RentalContract: one for the root and one for the Grid-nesting that shows the results from the variable vSeekerResult.
The root instance will always be null since this ViewModel does not require a root object to function. ViewModels designed for seeking seldom do. If it always will be null then there is little point in having an action that will be enabled only if it is assigned to an object. We should opt that root action out. Click the line to toggle the opt out state:
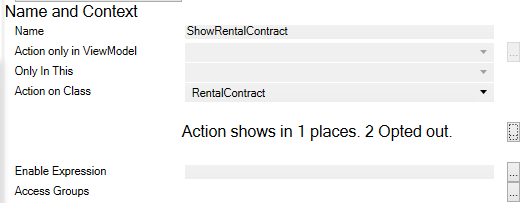
The ActionEditor was updated as well:
It now says the Action shows in 1 place – 2 opted out.
I have had my prototyping session running all along – but it still uses the model we had prior to our changes. I can now restart the prototyping by clicking play again, bringing up a new prototype window. Or I can just reread the model to the one I have. I see that the ShowRentalContract action is shown only once.
If you are alone for a day and you have lots of ideas, I assure you that you can model them in MDriven Designer and verify them in MDriven prototyper. When you are able to try and verify ideas rapidly, you will find many “think bugs” early. Bugs that make you say things like: “Oh, no – that is not a good way of doing it!”. Since the MDriven environment works as your autopilot and it has tens of thousands of flight hours under its belt, you will be freer in the creative part of your work.

