Denis Pupin (talk | contribs) |
m ((username removed) (log details removed): Moving to Training namespace) |
||
| (28 intermediate revisions by 4 users not shown) | |||
| Line 1: | Line 1: | ||
[https://www.capableobjects.com/downloads/downloads-2/ '''Download'''] the latest version of MDriven Designer. ''(Note! To open MDriven Designer from your browser you need to have a ClickOnce plugin: [https://chrome.google.com/webstore/detail/meta4-clickonce-launcher/jkncabbipkgbconhaajbapbhokpbgkdc?utm_source=chrome-app-launcher-info-dialog '''Chrome'''], [https://addons.mozilla.org/sv-SE/firefox/addon/ffclickonce/ '''Firefox''']).'' | [https://www.capableobjects.com/downloads/downloads-2/ '''Download'''] the latest version of MDriven Designer. ''(Note! To open MDriven Designer from your browser, you need to have a ClickOnce plugin: [https://chrome.google.com/webstore/detail/meta4-clickonce-launcher/jkncabbipkgbconhaajbapbhokpbgkdc?utm_source=chrome-app-launcher-info-dialog '''Chrome'''], [https://addons.mozilla.org/sv-SE/firefox/addon/ffclickonce/ '''Firefox''']).'' | ||
When MDriven Designer has opened, head to CloudForm window. | When MDriven Designer has opened, head to the CloudForm window. | ||
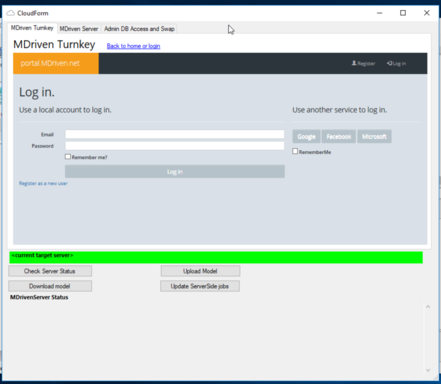
[[File:CloudFrom window.png|none|thumb|441x441px|CloudForm in MDriven Designer]]In the CloudForm | [[File:CloudFrom window.png|none|thumb|441x441px|CloudForm in MDriven Designer]]In the CloudForm, choose the option that suits you. If you don't have an account, you can '''register''' or if you already have an account, you can '''log in'''. | ||
After authorization press "Back to home or login" button. Now, you can head to "'''New site Request'''". | After authorization, press the "Back to home or login" button. Now, you can head to "'''New site Request'''". | ||
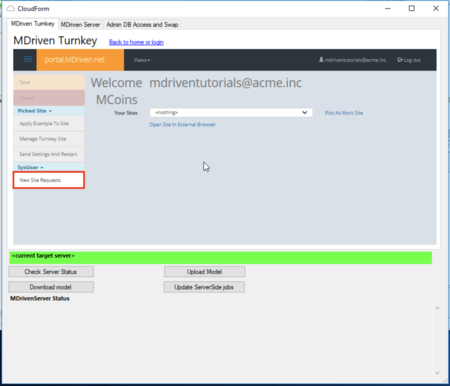
[[File:Request site creation.png|none|thumb|450x450px|Request site creation]]When you | [[File:Request site creation.png|none|thumb|450x450px|Request site creation]]When you press "New site Request," you will see the Existing Creation Requests page. | ||
To add creation request press "'''Add Creation Request'''" button and enter the application name then press "'''Save'''" button. | To add a creation request, press the "'''Add Creation Request'''" button and enter the application name, then press the "'''Save'''" button. | ||
[[File:Add creation request and name of application.png|none|thumb|462x462px|Add creation request and name of application]] | [[File:Add creation request and name of application.png|none|thumb|462x462px|Add a creation request and the name of the application]] | ||
Now, you just need to wait when our service will deploy MDriven Turnkey Application for you. It takes up to 5 minutes. | Now, you just need to wait for when our service will deploy MDriven Turnkey Application for you. It takes up to 5 minutes. | ||
You can see the changes | You can see the changes in the creation and site state of your application. | ||
[[File:Deployment status of application.png|none|thumb|483x483px|Deployment status of application]]Creation State: '''AvailableForCreationNode''' -> '''CreationNodeWorking''' -> '''CreationSuccess''' | [[File:Deployment status of application.png|none|thumb|483x483px|Deployment status of the application]]Creation State: '''AvailableForCreationNode''' -> '''CreationNodeWorking''' -> '''CreationSuccess''' | ||
Site state: '''Deploying''' -> '''Deployed''' | Site state: '''Deploying''' -> '''Deployed''' | ||
When site is deployed you can go back (press | When the site is deployed, you can go back (press the '''Back to home''' or '''login''' button) and pick this site as a work site. | ||
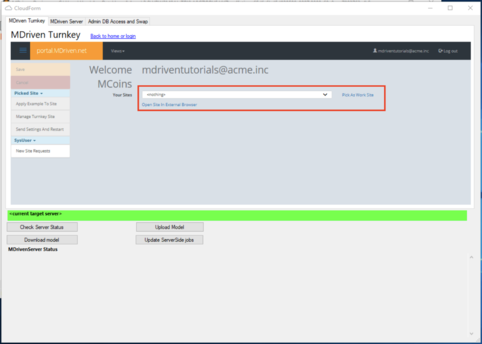
[[File:Pick site as a work site.png|none|thumb|482x482px|Pick site as a work site]] | [[File:Pick site as a work site.png|none|thumb|482x482px|Pick site as a work site]] | ||
When you picked your site you can '''open it in external browser''' or '''check server status''', '''download/upload model'''. | When you have picked your site, you can '''open it in an external browser''' or '''check the server status''', or '''download/upload the model'''. | ||
Now, your Turnkey application is installed. It is pretty much an empty application with only authorization services. You can start modeling or applying examples to your site. | |||
Still have questions? Watch the video tutorial below. | |||
See also: [[Troubleshooting Turnkey deployment]] | |||
== Video Tutorial == | |||
< | <html> | ||
<p> | <p class="video-warn"> | ||
To make your experience smooth, we set the main tags mentioned in the video to the right bar menu of this mini-player. Choose an interesting subtitle on the list and immediately get to the exact theme navigation item place in the video. Now you can pick any topic to be instructed on without watching the whole video. | |||
</p> | </p> | ||
< | <div class="video"> | ||
<div class="video__wrapper"> | |||
<iframe src="https://www.youtube.com/embed/Hp1Cw022bvg?rel=0&autoplay=0" frameborder="0" allowfullscreen></iframe> | |||
</div> | |||
<div class="video__navigation"> | |||
<span class="navigation-item" data-video="Hp1Cw022bvg"data-start="0" tabindex="0"> MDriven Turnkey site creation</span> | |||
<span class="navigation-item" data-video="Hp1Cw022bvg" data-start="0" tabindex="0"> Register/Login in MDriven Designer </span> | |||
<span class="navigation-item" data-video="Hp1Cw022bvg" data-start="32" tabindex="0"> New site request </span> | |||
<span class="navigation-item" data-video="Hp1Cw022bvg" data-start="52" tabindex="0"> Creation and Deploy process </span> | |||
<span class="navigation-item" data-video="Hp1Cw022bvg" data-start="120" tabindex="0"> Start modeling </span> | |||
<span class="navigation-item" data-video="Hp1Cw022bvg" data-start="240" tabindex="0"> Apply example to site</span> | |||
</div> | |||
<div | |||
<div> | |||
</div> | |||
</div> | </div> | ||
</html> | </html> | ||
[[Category:Beginner]] | |||
Revision as of 21:29, 20 December 2023
Download the latest version of MDriven Designer. (Note! To open MDriven Designer from your browser, you need to have a ClickOnce plugin: Chrome, Firefox).
When MDriven Designer has opened, head to the CloudForm window.
In the CloudForm, choose the option that suits you. If you don't have an account, you can register or if you already have an account, you can log in.
After authorization, press the "Back to home or login" button. Now, you can head to "New site Request".
When you press "New site Request," you will see the Existing Creation Requests page.
To add a creation request, press the "Add Creation Request" button and enter the application name, then press the "Save" button.
Now, you just need to wait for when our service will deploy MDriven Turnkey Application for you. It takes up to 5 minutes.
You can see the changes in the creation and site state of your application.
Creation State: AvailableForCreationNode -> CreationNodeWorking -> CreationSuccess
Site state: Deploying -> Deployed
When the site is deployed, you can go back (press the Back to home or login button) and pick this site as a work site.
When you have picked your site, you can open it in an external browser or check the server status, or download/upload the model.
Now, your Turnkey application is installed. It is pretty much an empty application with only authorization services. You can start modeling or applying examples to your site.
Still have questions? Watch the video tutorial below.
See also: Troubleshooting Turnkey deployment
Video Tutorial
To make your experience smooth, we set the main tags mentioned in the video to the right bar menu of this mini-player. Choose an interesting subtitle on the list and immediately get to the exact theme navigation item place in the video. Now you can pick any topic to be instructed on without watching the whole video.


