Charles Olet (talk | contribs) No edit summary |
Charles Olet (talk | contribs) No edit summary Tags: Manual revert Visual edit |
||
| (6 intermediate revisions by the same user not shown) | |||
| Line 10: | Line 10: | ||
=== Text Document === | === Text Document === | ||
1. Start by creating an OpenDocument text document using any office application that supports OpenDocument format. | '''1.''' Start by creating an OpenDocument text document using any office application that supports OpenDocument format. | ||
2. Add <code>%meta%</code> tag within the document as this will be used to print out all the available tags within our ViewModel for printing out Model data. | '''2.''' Add <code>%meta%</code> tag within the document as this will be used to print out all the available tags within our ViewModel for printing out Model data. | ||
Note: Make sure to write tags without spaces between the word(<code>meta</code>) and the percentage(<code>%</code>) signs. | Note: Make sure to write tags without spaces between the word(<code>meta</code>) and the percentage(<code>%</code>) signs. | ||
| Line 18: | Line 18: | ||
===== a) Temporary Location ===== | ===== a) Temporary Location ===== | ||
(i) Create a folder named temp in your C:/ directory and save your file in the directory as mytemplate.odt. | |||
(ii) Your url path will now be 'c:\\temp\\mytemplate.odt'. | |||
=====b) Permanent Location (AssetsTK Strategy)===== | |||
(i) This strategy allows your template document to be uploaded with your model onto the server running your Turnkey application during deployment. | |||
(ii) Go to the location where your .modlr file is saved. | |||
(iii) Create a folder with the name in the format of <YouModelFileName>_AssetsTK where <YouModelFileName> is the name of your .modlr file name. | |||
(iv) Within the folder create another folder named content where your save your template document. | |||
(v) Your url path will now be '<nowiki>http://localhost:8182/content/mytemplate.odt'</nowiki> | |||
(vi) [[Documentation:SysSingleton GetSystemUrl|Check here]] on how to have a dynamic url for when your deploy your application onto the Mdriven Server. | |||
In the TemplateUrl column expression, enter the url path created earlier using any of the saving strategies above. | |||
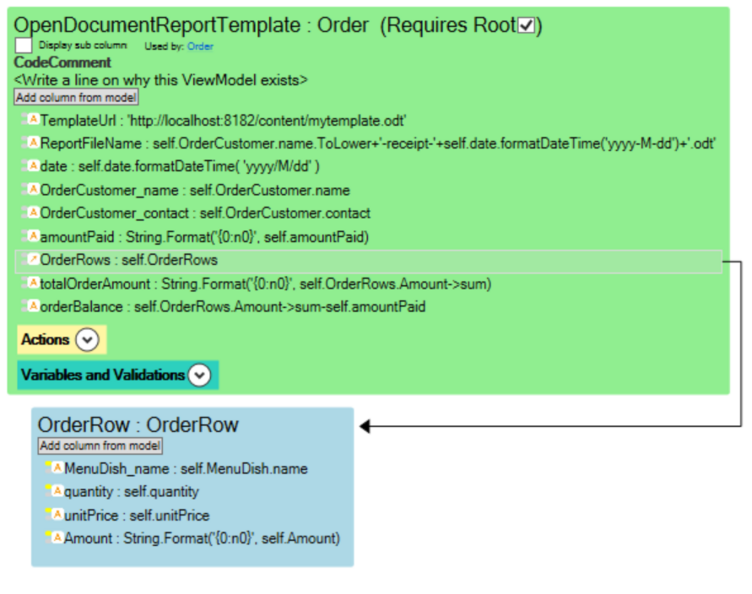
'''3.''' Create a ViewModel with the Name OpenDocumentReportTemplate. This ViewModel will be used a template for the Model-Driven data to generate reports | |||
'''4.''' Within the ViewModel context menu, click Add column > Add columns needed for Report or create columns TemplateUrl and ReportFileName within the viewmodel. | |||
'''5.''' Select the view model to view the settings on the right. Uncheck Use placing hints section at the top. | |||
'''6.''' In the TemplateUrl column expression, enter the url path created earlier using any of the saving strategies above. | |||
in the ReportFileName column expression enter a file name for the new OpenDocument that will be generated in the format '<FileName>.odt' where <FileName> is the name of your file. | in the ReportFileName column expression enter a file name for the new OpenDocument that will be generated in the format '<FileName>.odt' where <FileName> is the name of your file. | ||
| Line 61: | Line 64: | ||
{| class="wikitable" | {| class="wikitable" | ||
|+ | |+ | ||
|%%+<Nested ViewModel Column Name>%%<First Column Name>% | |%%+<Nested ViewModel Column Name>%%<First Column Name>% | ||
|%<Column Name>% | |%<Column Name>% | ||
|%<Column Name>% | |%<Column Name>% | ||
|} | |} | ||
[[File:OpenDocumentTemplateViewModel.png|alt=ViewModel Template for Printing out Model-Driven data to OpenDocument reports|none|thumb|752x752px|ViewModel Template]] | [[File:OpenDocumentTemplateViewModel.png|alt=ViewModel Template for Printing out Model-Driven data to OpenDocument reports|none|thumb|752x752px|ViewModel Template]] | ||
| Line 107: | Line 110: | ||
The MDriven Book - See: [[/learn.mdriven.net/Training:Prototyping|Prototyping]] | The MDriven Book - See:[[/learn.mdriven.net/Training:Prototyping|Prototyping]] | ||
Revision as of 14:29, 12 June 2024
Generate Reports Using OpenDocument and Microsoft Office
OpenDocument format is an open file format standard for office applications compatible with Microsoft office and open source applications like LibreOffice and OpenOffice.
Common filename extensions used of OpenDocument documents are:
.odtfor text documents.odsfor spreadsheet documents
Mdriven applications allow generating reports from model-driven data using OpenDocument format.
Text Document
1. Start by creating an OpenDocument text document using any office application that supports OpenDocument format.
2. Add %meta% tag within the document as this will be used to print out all the available tags within our ViewModel for printing out Model data.
Note: Make sure to write tags without spaces between the word(meta) and the percentage(%) signs.
Saving Strategies
a) Temporary Location
(i) Create a folder named temp in your C:/ directory and save your file in the directory as mytemplate.odt.
(ii) Your url path will now be 'c:\\temp\\mytemplate.odt'.
b) Permanent Location (AssetsTK Strategy)
(i) This strategy allows your template document to be uploaded with your model onto the server running your Turnkey application during deployment.
(ii) Go to the location where your .modlr file is saved.
(iii) Create a folder with the name in the format of <YouModelFileName>_AssetsTK where <YouModelFileName> is the name of your .modlr file name.
(iv) Within the folder create another folder named content where your save your template document.
(v) Your url path will now be 'http://localhost:8182/content/mytemplate.odt'
(vi) Check here on how to have a dynamic url for when your deploy your application onto the Mdriven Server.
3. Create a ViewModel with the Name OpenDocumentReportTemplate. This ViewModel will be used a template for the Model-Driven data to generate reports
4. Within the ViewModel context menu, click Add column > Add columns needed for Report or create columns TemplateUrl and ReportFileName within the viewmodel.
5. Select the view model to view the settings on the right. Uncheck Use placing hints section at the top.
6. In the TemplateUrl column expression, enter the url path created earlier using any of the saving strategies above.
in the ReportFileName column expression enter a file name for the new OpenDocument that will be generated in the format '<FileName>.odt' where <FileName> is the name of your file.
create a class action within the ViewModel whose data your want to print out using the expression below;
self.opendocumentreportshow(<classname>.ViewModels.OpenDocumentReportTemplate)
where <classname> is the root class of the viewmodel.
within OpenDocumentReportTemplate add columns whose data you want to print out.
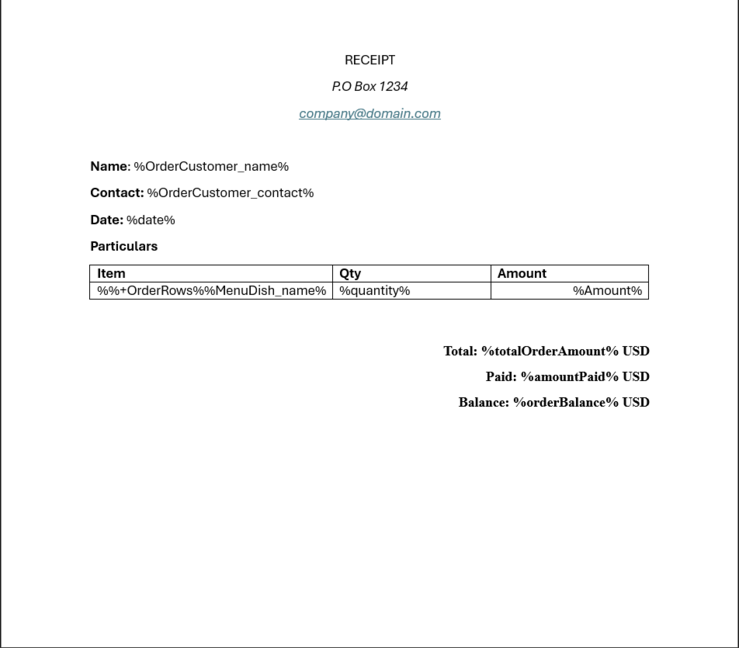
Trigger print out using the created class action and first print out will return all tags available for printing out data. Use these tags to format structure your report document.
If you dont want to use the %meta% tag to print out the available tags first. You may use the column names directly with the same expression. %<ColumnName>%.
To print out nested columns in a table format.
Create table add the expression
| %%+<Nested ViewModel Column Name>%%<First Column Name>% | %<Column Name>% | %<Column Name>% |
The table format is for both text documents and spreadsheet documents.
When using Microsoft Office Word, Check here for format styling that is supported in OpenDocument format.
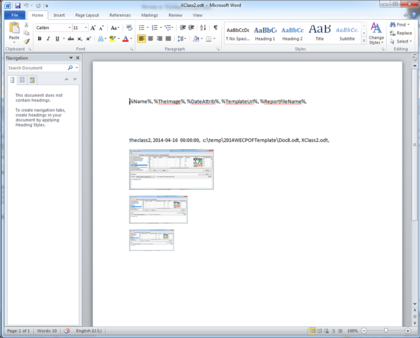
Create a Word template:
%Class2[Name=Hello1]Name%
What this means is that we are navigating to ViewModel column Class2 – but this is a list – and filter the result on the ViewModel column Name of ViewModelClass Class2. Taking the one with value “Hello1” – for that Class2 we use the Name column… Example:
OpenDocument Configurations and Settings
The MDriven Book - See:Prototyping


