
This guide installs the .NET Framework build of MDriven Server and MDriven Turnkey (download Windows .NET Framework) in IIS.
The .NET Framework build is still supported, but it is not the recommended path for new installations. For new installations use the .NET Core build. To move an existing installation, see Migrating from .NET Framework to .NET Core.
1. Install IIS and its features
Use a supported version of Windows Server or Windows 10/11 with .NET Framework 4.8.
- On Windows Server, add the role Web Server (IIS) in Server Manager. On Windows 10/11, open Control Panel → Programs and Features → Turn Windows features on or off and add Internet Information Services.

- Add ASP.NET 4.x (4.7 or later) and its components. ISAPI depends on ASP.NET 4.7 and may be skipped.

- Under World Wide Web Services → Common HTTP Features, select Static Content if it is not selected.
- Under Application Development, select WebSocket Protocol – see Turn on WebSockets in IIS.
- If you use WCF (WebApi does not): under .NET Framework 4.x Features → WCF Services, select HTTP Activation and TCP Port Sharing. Without HTTP Activation you get Error 405 – Method not allowed instead of the MDriven login screen.

Also consider adding:
- Logging Tools, Request Monitor and Tracing
- Dynamic Content Compression and Application Initialization
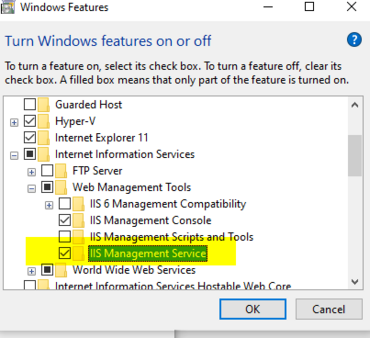
- Management Service and IIS Management Scripts and Tools
- Basic Authentication, Windows Authentication or another authentication service
2. Install Web Deploy
The .NET Framework downloads are Web Deploy packages. Web Deploy adds Import Application to IIS Manager, which makes installation and updates simple.
- Install Microsoft Web Deploy.
- Make sure IIS Deployment Handler is installed (custom installation, or Change an existing installation).
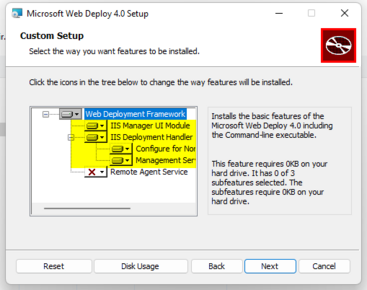
- If the IIS Deployment Handler option is missing, turn on the IIS feature below and run Repair on Web Deploy.


3. Create the application pool
In IIS Manager, add an application pool with .NET CLR v4.0 and Integrated pipeline mode.


Then select the pool, open Advanced Settings and set:
- Start Mode: AlwaysRunning
- Identity: the account that suits your environment (default: ApplicationPoolIdentity)
- CPU → Limit Interval (minutes): 1
- Disable Overlapped Recycle: True

When you host several sites on one server, also see Memory optimization.
Folder permissions
The application runs as the application pool user when it accesses the disk. It uses %temp% to extract AssetsTK and CodeDress assemblies from the model, and needs access to the whole application folder to distribute CodeDress assemblies. The logs folder must allow Write and Modify. See AppPool user.
4. Add a certificate
MDriven Server calls itself, so the certificate must be valid for the address you use, and trusted on the server itself – otherwise the server cannot start. For a test, you can create a self-signed certificate in IIS Manager → Server Certificates, issued to the server's full machine name. See Certificates and HTTPS on IIS.

On the site (for example Default Web Site), add an https binding on port 443 with the certificate.

5. Install MDriven Turnkey and MDriven Server
The standard layout has Turnkey as the application and MDriven Server as an application called __MDrivenServer (two underscores) below it. Turnkey looks for its server at that address by default.
- Create an application with your app's name, for example MyTurnkeyApp, using the application pool from step 3. (To have the app at the site root, deploy Turnkey to the site itself instead.)
- Below it, create another application called
__MDrivenServer, so that it becomes MyTurnkeyApp/__MDrivenServer. - Use Import Application to install MDriven Turnkey into MyTurnkeyApp and MDriven Server into MyTurnkeyApp/__MDrivenServer, from the zips on the MDriven downloads page. If you created the applications first, leave the Application Path field empty so the structure is kept.
- Updating: choose to overwrite, and do not remove existing files – the settings and MDriven Server's database in
App_Datamust stay.
- Updating: choose to overwrite, and do not remove existing files – the settings and MDriven Server's database in

The result:

6. Set up MDriven Server
Open MDriven Server in a browser:
https://<server name in the certificate>/<your application>/__MDrivenServer/
Use the name in the certificate (usually the full machine name with domain), not localhost.
- Register a new user for MDriven Server, for example admin (not a – that one is used by Turnkey).

- Log in and go to Admin area → Infos, errors and MDrivenServer evolve, and push Evolve Admin database.
- Turnkey uses a user account named a. Go to AutoForm, set databaseIdentity to admin, choose ASP_User → Show, open the user a with Details and rename it.

- Log out, and register the user a with your own password.
Then connect your data database (see Store the data in SQL Server), upload your model from MDriven Designer, and protect the server – see Set up MDriven Turnkey on premise for turning off registration and requiring identification.
Troubleshooting
- 403 when you open MDriven Server: make sure ASP.NET 4.7 or later is installed.
- 405 – Method not allowed: WCF HTTP Activation is missing (step 1).
- Certificate errors: Certificates and HTTPS on IIS.
- The application pool keeps restarting: IIS application restart problem.
- More: An application does not start in IIS.
Automating
The MDriven Installation Scripts are made for the .NET Core builds. For the .NET Framework build, see the older msdeploy approach.
Video
This video shows an installation of the .NET Framework build. It was made when MDriven Server still had the working name "Boring Predictable Server".